Setting Up MLflow on GCP for Experiment Tracking
 Isaac Kargar5 min read
MLflow’s tracking server gives a team one place to record parameters, metrics, tags, and model artifacts. This walkthrough runs the server on a Compute Engine VM, keeps metadata in Cloud SQL for PostgreSQL, and lets the server proxy artifact access to a Cloud Storage bucket.
The tracking server is the boundary that clients use. Clients send tracking requests to the server; the server writes tracking entities to the SQL backend and artifacts to the configured object store. With proxied artifact storage, data scientists do not need direct credentials for the bucket. Read the MLflow tracking server architecture documentation for the supported modes.
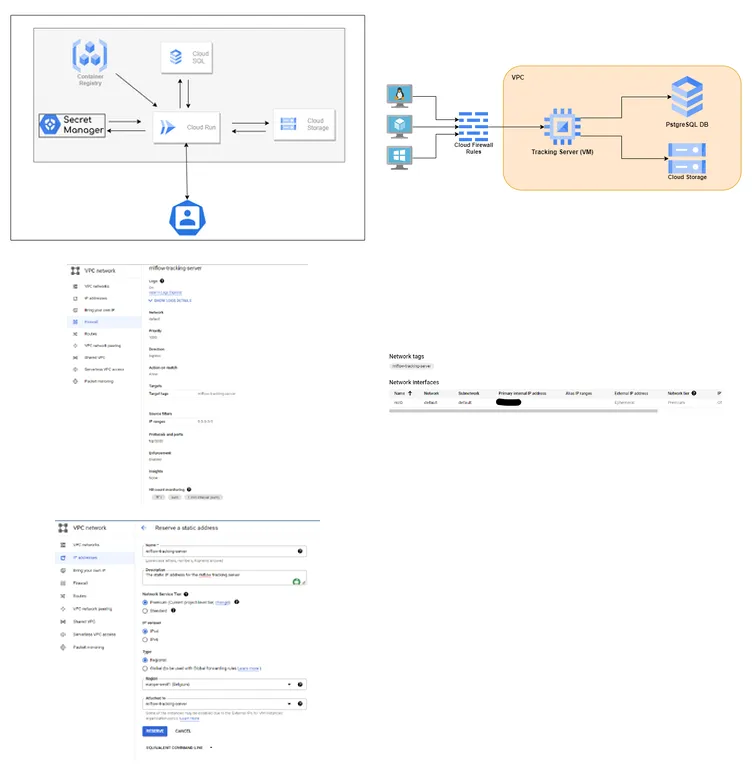
The resulting Google Cloud layout is:
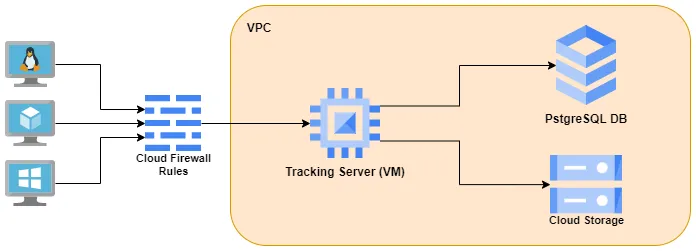
| Component | Responsibility | Identity used by the example |
|---|---|---|
| Compute Engine VM | Runs the MLflow tracking server and Cloud SQL Auth Proxy | A dedicated VM service account |
| Cloud SQL for PostgreSQL | Stores experiments, runs, parameters, metrics, and tags | The proxy and server use the VM identity |
| Cloud Storage bucket | Stores model files and other artifacts | The VM identity, through MLflow’s proxy |
| Training client | Sends MLflow API requests | Its normal network access to the tracking endpoint |
Choose the resource values
The commands below use variables so the example can be repeated in another project. They describe billable resources; review the Google Cloud pricing and your organisation’s policies before creating them.
export PROJECT_ID="YOUR_GCP_PROJECT"
export REGION="europe-west1"
export ZONE="europe-west1-b"
export ARTIFACT_BUCKET="YOUR_UNIQUE_MLFLOW_BUCKET"
export RUNTIME_SA="mlflow-runtime@${PROJECT_ID}.iam.gserviceaccount.com"
export VM_NAME="mlflow-tracking"
export SQL_INSTANCE="mlflow-metadata"
export SQL_DATABASE="mlflow"
export SQL_USER="mlflow"
export SQL_PASSWORD="choose-a-secret-password"
export CLIENT_CIDR="YOUR_CLIENT_IP/32"
Use a password that is kept in Secret Manager or a protected runtime environment. If it contains URL-reserved characters, URL-encode it before placing it in a SQLAlchemy connection URL.
Enable only the APIs needed by this example:
gcloud config set project "$PROJECT_ID"
gcloud services enable compute.googleapis.com sqladmin.googleapis.com \
  storage.googleapis.com iam.googleapis.com
Create the runtime service account, grant it access to the bucket and Cloud SQL, and create the bucket. The account is for the VM workload, so local clients do not need a downloaded JSON key.
gcloud iam service-accounts create mlflow-runtime \
  --display-name="MLflow tracking runtime"

gcloud storage buckets create "gs://$ARTIFACT_BUCKET" \
  --project="$PROJECT_ID" \
  --location="$REGION" \
  --uniform-bucket-level-access

gcloud storage buckets add-iam-policy-binding "gs://$ARTIFACT_BUCKET" \
  --member="serviceAccount:$RUNTIME_SA" \
  --role="roles/storage.objectAdmin"

gcloud projects add-iam-policy-binding "$PROJECT_ID" \
  --member="serviceAccount:$RUNTIME_SA" \
  --role="roles/cloudsql.client"
For a production deployment, replace broad project-level permissions with resource-level roles and an organisation-approved secret path.
Create Cloud SQL
Create a PostgreSQL instance using the tier and availability settings that suit the workload. A small development instance is enough for learning; the exact machine shape is a cost and reliability decision.
gcloud sql instances create "$SQL_INSTANCE" \
  --project="$PROJECT_ID" \
  --database-version=POSTGRES_16 \
  --region="$REGION" \
  --cpu=2 \
  --memory=7680MiB

gcloud sql databases create "$SQL_DATABASE" \
  --instance="$SQL_INSTANCE"

gcloud sql users create "$SQL_USER" \
  --instance="$SQL_INSTANCE" \
  --password="$SQL_PASSWORD"

export INSTANCE_CONNECTION_NAME="$(
  gcloud sql instances describe "$SQL_INSTANCE" \
    --format="value(connectionName)"
)"
printf 'Cloud SQL connection name: %s\n' "$INSTANCE_CONNECTION_NAME"
The instance must be reachable from the VM. A private-IP setup keeps database traffic inside the VPC. The Cloud SQL Auth Proxy is an alternative that authenticates with the VM identity and forwards a local port; this tutorial uses the proxy so the MLflow process does not need a public database address.
Create the tracking VM
Restrict the MLflow port to the clients that need it. The source range below is a placeholder for the team’s egress address, not a public-open rule.
gcloud compute firewall-rules create mlflow-tracking-ingress \
  --project="$PROJECT_ID" \
  --network=default \
  --priority=1000 \
  --direction=INGRESS \
  --action=ALLOW \
  --target-tags=mlflow-tracking \
  --source-ranges="$CLIENT_CIDR" \
  --rules=tcp:5000 \
  --enable-logging

gcloud compute instances create "$VM_NAME" \
  --project="$PROJECT_ID" \
  --zone="$ZONE" \
  --machine-type=e2-standard-2 \
  --service-account="$RUNTIME_SA" \
  --scopes=cloud-platform \
  --tags=mlflow-tracking
The VM service account supplies Application Default Credentials to programs running on the VM. The network and identity settings are the important parts of this command:
| Setting | Value in this example | Why it matters |
|---|---|---|
| Network tag | mlflow-tracking | Selects the firewall rule |
| Runtime identity | mlflow-runtime | Grants Cloud Storage and Cloud SQL access |
| Tracking port | TCP 5000 | Carries MLflow client traffic |
| Database path | Cloud SQL Auth Proxy | Avoids a public database endpoint |
The VM’s external IP can change when the instance is recreated. Use a reserved address or an internal access path when clients need a stable endpoint. The tracking server should also sit behind the organisation’s authentication and TLS boundary for a shared production service.
Install the server and proxy on the VM
Connect to the VM using the Cloud SDK. Install the current Cloud SQL Auth Proxy release and Python packages according to the Cloud SQL Auth Proxy guide. The proxy uses the VM’s attached identity.
gcloud compute ssh "$VM_NAME" --zone="$ZONE"

# Run these exports in the VM shell. The local shell's variables are not
# forwarded by gcloud compute ssh. Use the connection name printed above.
export INSTANCE_CONNECTION_NAME="PROJECT_ID:REGION:SQL_INSTANCE"
export ARTIFACT_BUCKET="YOUR_UNIQUE_MLFLOW_BUCKET"
export SQL_USER="mlflow"
export SQL_DATABASE="mlflow"
export SQL_PASSWORD="choose-a-secret-password"

python3 -m venv ~/mlflow-env
source ~/mlflow-env/bin/activate
python -m pip install --upgrade pip
python -m pip install \
  mlflow==3.5.0 \
  psycopg2-binary==2.9.10 \
  google-cloud-storage==3.4.0
In another VM shell, start the proxy. Place the proxy binary at ~/cloud-sql-proxy and make it executable as described by the official guide:
~/cloud-sql-proxy "$INSTANCE_CONNECTION_NAME" --address 127.0.0.1 --port 5432In the shell that runs MLflow, provide the database URL and the proxied artifact destination. The tracking server’s current flags are backend-store-uri and artifacts-destination.
export BACKEND_STORE_URI="postgresql+psycopg2://${SQL_USER}:${SQL_PASSWORD}@127.0.0.1:5432/${SQL_DATABASE}"

mlflow server \
  --host 0.0.0.0 \
  --port 5000 \
  --backend-store-uri "$BACKEND_STORE_URI" \
  --artifacts-destination "gs://$ARTIFACT_BUCKET"
MLflow serves the UI and API at port 5000. Open the endpoint through the approved network path. The server process must be supervised and configured with TLS or an authenticated reverse proxy before it is exposed to a team.
Send a held-out evaluation from a client
Install the same MLflow client package on a workstation or training VM, set the tracking URI to the server endpoint, and run a small Iris experiment. The evaluation uses a held-out split, so the metric describes data not used to fit the classifier.
import os

import mlflow
import mlflow.sklearn
from sklearn.datasets import load_iris
from sklearn.linear_model import LogisticRegression
from sklearn.metrics import accuracy_score
from sklearn.model_selection import train_test_split


tracking_endpoint = os.environ["MLFLOW_TRACKING_URI"]
mlflow.set_tracking_uri(tracking_endpoint)
mlflow.set_experiment("iris-remote-example")

features, labels = load_iris(return_X_y=True)
X_train, X_test, y_train, y_test = train_test_split(
    features,
    labels,
    test_size=0.2,
    random_state=42,
    stratify=labels,
)

with mlflow.start_run() as run:
    model = LogisticRegression(C=0.1, max_iter=500, random_state=42)
    model.fit(X_train, y_train)
    predictions = model.predict(X_test)

    mlflow.log_param("model", "logistic-regression")
    mlflow.log_param("test_size", 0.2)
    mlflow.log_metric("test_accuracy", accuracy_score(y_test, predictions))
    mlflow.sklearn.log_model(model, artifact_path="model")

    run_id = run.info.run_id

print(f"tracking URI: {mlflow.get_tracking_uri()}")
print(f"run ID: {run_id}")
print([experiment.name for experiment in mlflow.search_experiments()])
The run identifier comes from the execution that just completed. It is useful for a later API call. Use mlflow.search_experiments() to list experiments.
The artifact is available through the tracking server’s proxied path. Clients can download it through MLflow’s API without receiving direct bucket credentials:
import mlflow

local_path = mlflow.artifacts.download_artifacts(
    run_id=run_id,
    artifact_path="model",
)
print(local_path)
Ongoing operation
The tracking server stores metadata in SQL and artifacts in GCS. Back up the database, configure bucket retention and access logging, rotate the database secret, and monitor VM, proxy, and MLflow logs. Keep the database and bucket in the same region when that matches your latency and governance requirements.
MLflow also documents a managed Cloud Run deployment on Google Cloud. It is an alternative topology, not part of this VM walkthrough. The same backend-store, artifact-destination, identity, secret, and network decisions still apply.
Work with Nazmi
Build your AI system with Nazmi.
Tell us what you are building, what exists today, and where your team needs help.
Start a conversation or book a 20-minute call →