
Data Engineering — Week 2b: Data Ingestion with Airflow
We talked about data ingestion and Airflow in the previous blog post. Let’s continue with the second one here.
Ingest Data to GCS and BigQuery using Airflow
First, there are some prerequisites. For the sake of standardization across this tutorial’s config, rename your GCP-service-accounts-credentials file to google_credentials.json and store it in your $HOME directory:
cd ~ && mkdir -p ~/.google/credentials/
mv <path/to/your/service-account-authkeys>.json ~/.google/credentials/google_credentials.json
In order to use airflow with GCP, we have changed the docker-compose.yaml file in this course as follows:
- instead of using the official airflow image as the base image, we use a custom docker file to build and start from.
build:
    context: .
dockerfile: ./Dockerfile- disable loading the DAG examples that ship with Airflow. It’s good to get started, but you probably want to set this to False in a production environment
AIRFLOW__CORE__LOAD_EXAMPLES: 'false'- and add GCP environment variables (you need to use your own GCP project id and the GCS bucket you created in the previous week)
GOOGLE_APPLICATION_CREDENTIALS: /.google/credentials/google_credentials.json
AIRFLOW_CONN_GOOGLE_CLOUD_DEFAULT: 'google-cloud-platform://?extra__google_cloud_platform__key_path=/.google/credentials/google_credentials.json'
GCP_PROJECT_ID: 'pivotal-surfer-336713'
GCP_GCS_BUCKET: "dtc_data_lake_pivotal-surfer-336713"- add the folder we created at the beginning of the post for google credentials.
- ~/.google/credentials/:/.google/credentials:roHere is the beginning of the file after our modifications:
build:
    context: .
    dockerfile: ./Dockerfile
  environment:
    &airflow-common-env
    AIRFLOW__CORE__EXECUTOR: CeleryExecutor
    AIRFLOW__CORE__SQL_ALCHEMY_CONN: postgresql+psycopg2://airflow:airflow@postgres/airflow
    AIRFLOW__CELERY__RESULT_BACKEND: db+*************************************/airflow
    AIRFLOW__CELERY__BROKER_URL: redis://:@redis:6379/0
    AIRFLOW__CORE__FERNET_KEY: ''
    AIRFLOW__CORE__DAGS_ARE_PAUSED_AT_CREATION: 'true'
    AIRFLOW__CORE__LOAD_EXAMPLES: 'false'
    AIRFLOW__API__AUTH_BACKEND: 'airflow.api.auth.backend.basic_auth'
    _PIP_ADDITIONAL_REQUIREMENTS: ${_PIP_ADDITIONAL_REQUIREMENTS:-}
    GOOGLE_APPLICATION_CREDENTIALS: /.google/credentials/google_credentials.json
    AIRFLOW_CONN_GOOGLE_CLOUD_DEFAULT: 'google-cloud-platform://?extra__google_cloud_platform__key_path=/.google/credentials/google_credentials.json'
    GCP_PROJECT_ID: 'pivotal-surfer-336713'
    GCP_GCS_BUCKET: "dtc_data_lake_pivotal-surfer-336713"

volumes:
    - ./dags:/opt/airflow/dags
    - ./logs:/opt/airflow/logs
    - ./plugins:/opt/airflow/plugins
    - ~/.google/credentials/:/.google/credentials:ro
Following is the custom Dockerfile which is placed inside the airflow folder. The Dockerfile has the custom packages to be installed. The one we’ll need the most is gcloud to connect with the GCS bucket or data lake.
# First-time build can take upto 10 mins.

FROM apache/airflow:2.2.3

ENV AIRFLOW_HOME=/opt/airflow

USER root
RUN apt-get update -qq && apt-get install vim -qqq
# git gcc g++ -qqq

COPY requirements.txt .
RUN pip install --no-cache-dir -r requirements.txt

# Ref: https://airflow.apache.org/docs/docker-stack/recipes.html
SHELL ["/bin/bash", "-o", "pipefail", "-e", "-u", "-x", "-c"]
ARG CLOUD_SDK_VERSION=322.0.0
ENV GCLOUD_HOME=/home/google-cloud-sdk
ENV PATH="${GCLOUD_HOME}/bin/:${PATH}"
RUN DOWNLOAD_URL="https://dl.google.com/dl/cloudsdk/channels/rapid/downloads/google-cloud-sdk-${CLOUD_SDK_VERSION}-linux-x86_64.tar.gz" \
    && TMP_DIR="$(mktemp -d)" \
    && curl -fL "${DOWNLOAD_URL}" --output "${TMP_DIR}/google-cloud-sdk.tar.gz" \
    && mkdir -p "${GCLOUD_HOME}" \
    && tar xzf "${TMP_DIR}/google-cloud-sdk.tar.gz" -C "${GCLOUD_HOME}" --strip-components=1 \
    && "${GCLOUD_HOME}/install.sh" \
       --bash-completion=false \
       --path-update=false \
       --usage-reporting=false \
       --quiet \
    && rm -rf "${TMP_DIR}" \
    && gcloud --version
WORKDIR $AIRFLOW_HOME
USER $AIRFLOW_UID
The requirements.txt file in the Dockerfile that contains the required python packages is as follows:
apache-airflow-providers-google
pyarrow
In case you don’t want to see so many services as it is done in the above docker-compose.yaml file, you can use the following one which is placed in the week_2_data_ingestion/airflow/extras folder in the course GitHub repo:
version: '3.7'
services:
    webserver:
        container_name: airflow
        build:
            context: ..
            dockerfile: ../Dockerfile
        environment:
            - PYTHONPATH=/home/airflow
            # airflow connection with SQLAlchemy container
            - AIRFLOW__CORE__SQL_ALCHEMY_CONN=sqlite:///$AIRFLOW_HOME/airflow.db
            - AIRFLOW__CORE__EXECUTOR=LocalExecutor
            # disable example loading
            - AIRFLOW__CORE__LOAD_EXAMPLES=FALSE

volumes:
            - ./dags:/home/airflow/dags
        # user: "${AIRFLOW_UID:-50000}:0"
        ports:
            - "8080:8080"
        command: >  # airflow db upgrade;
            bash -c "
                airflow scheduler -D;
                rm /home/airflow/airflow-scheduler.*;
                airflow webserver"
        healthcheck:
            test: [ "CMD-SHELL", "[ -f /home/airflow/airflow-webserver.pid ]" ]
            interval: 30s
            timeout: 30s
            retries: 3
To avoid any confusion, we will not use this file.
There is also another lightweight and less memory-intensive docker-compose file in the GitHub repo which can be used.
There is another one from one of the students here which sound interesting too.
Before starting Airflow for the first time, You need to prepare your environment, i.e. create the necessary files, and directories and initialize the database.
On Linux, the quick-start needs to know your host user id and needs to have the group id set to 0. Otherwise, the files created in dags, logs and plugins will be created with root user. You have to make sure to configure them for the docker-compose: (Run it inside the airflow folder where the docker-compose.yaml file is placed.) [ Airflow docs]
mkdir -p ./dags ./logs ./plugins
echo -e "AIRFLOW_UID=$(id -u)" > .env
For other operating systems, you will get warning that AIRFLOW_UID is not set, but you can ignore it. You can also manually create the .env file in the same folder your docker-compose.yaml is placed with this content to get rid of the warning:
AIRFLOW_UID=1000Read more about environment variables for compose here. It seems that when we run, it looks for .env file in the same directory and uses the variables in that file.
Then we need to initialize the database. On all operating systems, you need to run database migrations and create the first user account. To do it, run.
docker-compose build
docker-compose up airflow-init
docker-compose up
You may also see some errors, but you can ignore them as they are for some services in the official docker-compose file that we do not use.
You can check which services are up using:
docker-compose psFor me, the output is as follows:
airflow-airflow-scheduler-1   "/usr/bin/dumb-init …"   airflow-scheduler   running (healthy)   8080/tcp
airflow-airflow-triggerer-1   "/usr/bin/dumb-init …"   airflow-triggerer   running (healthy)   8080/tcp
airflow-airflow-webserver-1   "/usr/bin/dumb-init …"   airflow-webserver   running (healthy)   0.0.0.0:8080->8080/tcp, :::8080->8080/tcp
airflow-airflow-worker-1      "/usr/bin/dumb-init …"   airflow-worker      running (healthy)   8080/tcp
airflow-flower-1              "/usr/bin/dumb-init …"   flower              running (healthy)   0.0.0.0:5555->5555/tcp, :::5555->5555/tcp
airflow-postgres-1            "docker-entrypoint.s…"   postgres            running (healthy)   5432/tcp
airflow-redis-1               "docker-entrypoint.s…"   redis               running (healthy)   6379/tcp
There are several ways to interact with it:
- by running CLI commands.
- via a browser using the web interface.
- using the REST API.
For the web interface, you can go to this address: http://0.0.0.0:8080/
The airflow UI will be like this:
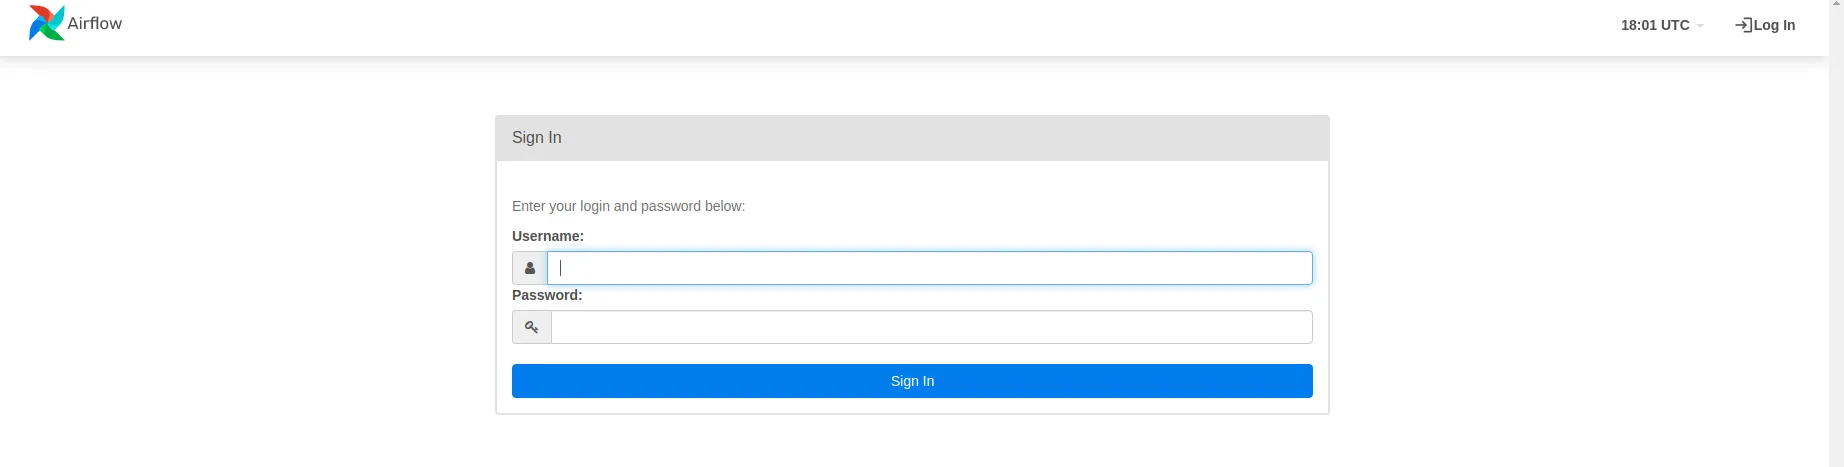
The account created has a login airflow and a password airflow. After logging in, you will see two generated DAGs from the week_2_data_ingestion/airflow/dags folder.
A Workflow has the following components:
-
DAG: Directed acyclic graph, specifies the dependencies between a set of tasks with explicit execution order, and has a beginning as well as an end. (Hence, “acyclic”)DAG Structure: DAG Definition, Tasks (eg. Operators), Task Dependencies (control flow:>>or<<)
-
Task: a defined unit of work (aka, operators in Airflow). The Tasks themselves describe what to do, be it fetching data, running analysis, triggering other systems, or more.-
Common Types: Operators (used in this workshop), Sensors, TaskFlow decorators
-
Sub-classes of Airflow’s BaseOperator
-
-
DAG Run: individual execution/run of a DAG- scheduled or triggered
-
Task Instance: an individual run of a single task. Task instances also have an indicative state, which could be “running”, “success”, “failed”, “skipped”, “up for retry”, etc.- Ideally, a task should flow from
none, toscheduled, toqueued, torunning, and finally tosuccess.
- Ideally, a task should flow from
Let’s look at how to use Airflow to ingest data into GCP. To do so, we’ll need to create a DAG object. One thing to remember is that this Airflow Python script is really just a configuration file that specifies the DAG’s structure as code. The tasks defined here will be executed in a context distinct from that of this script. This script cannot be used to cross-communicate between tasks because different tasks run on different workers at different times. Note that we have a more advanced feature called XComs that can be used for this purpose [ Airflow docs].
People mistakenly believe that the DAG definition file is where they can do actual data processing — this is not the case! The goal of the script is to create a DAG object. It must evaluate quickly (seconds, not minutes) because the scheduler will run it on a regular basis to reflect any changes [ Airflow docs].
The structure of a DAG file is as follows:
# Imports
from airflow import DAG
...

default_args = {
    ...
}

with DAG(
    'tutorial',
    default_args=default_args,
    description='A simple tutorial DAG',
    schedule_interval=timedelta(days=1),
    start_date=datetime(2021, 1, 1),
    catchup=False,
    tags=['example'],
) as dag:
    # t1, t2 and t3 are examples of tasks created by instantiating operators
    t1 = BashOperator(
        task_id='print_date',
        bash_command='date',
    )
    t2 = ...
    t3 = ...
    ## defining task dependencies
t1 >> [t2, t3]- An Airflow pipeline is just a Python script that happens to define an Airflow DAG object.
- We have the choice to explicitly pass a set of arguments to each task’s constructor (which would become redundant), or (better!) we can define a dictionary of default parameters that we can use when creating tasks.
- We’ll need a DAG object to nest our tasks into. Here we pass a string that defines the dag_id, which serves as a unique identifier for your DAG. We also pass the default argument dictionary that we just defined and define a schedule_interval of 1 day for the DAG.
- Tasks are generated when instantiating operator objects. An object instantiated from an operator is called a task. The first argument task_id acts as a unique identifier for the task.
- Then we need to define dependencies between tasks.
You can check more tutorials and examples here.
Now let’s see our own DAG file for ingesting yellow_tripdata_2021-01.csv datasets into GCP which is placed in week_2_data_ingestion/airflow/dags/data_ingestion_gcs_dag.py. First, let’s check the structure:
-
importing python libraries
-
in-built airflow like
BashOperatorandPythonOperator. There is alsoDockerOperatorto run docker in docker! -
storagefrom google cloud library to interact with GCS. -
BigQuery from google airflow provider to interact with BigQuery and create an external table.
-
pyarrowlibrary for converting dataset type toparquetbefore uploading it to GCS.parquetis used more in production and is faster to upload it and also uses less space on GCS.
-
-
setting some variables
-
GCP_PROJECT_ID,GCP_GCS_BUCKETwhich we set in thedocker-compose.yamlfile underx-airflow-commonsection. -
info about dataset URL
-
airflow local folder path
-
the name of the desired parquet file
-
BigQuery dataset which can be found from
variables.tffrom terraform folder of week 1 (inweek_1_basics_n_setup/1_terraform_gcp/terraform/variables.tf). I think the name wasBQ_DATASETthere, but the value is the sametrips_data_all.
-
-
Some python functions will be attached to
PythonOperators likeformat_to_parquet()andupload_to_gcs(). Their names describe their functionality. -
Default arguments that will be used in the DAG definition.
-
Then the DAG declaration with tasks and their dependencies
-
download_dataset_taskto download the dataset using a bash command. -
format_to_parquet_taskwhich calls theformat_to_parquet()function. -
local_to_gcs_taskwhich calls theupload_to_gcs()function. -
bigquery_external_table_taskto extract schema and create a BigQuery table from the file uploaded to GCS. You can easily run SQL queries on this table.
-
-
Then the workflow for the direction of tasks:
download_dataset_task >> format_to_parquet_task >> local_to_gcs_task >> bigquery_external_table_task
import os
import logging

from airflow import DAG
from airflow.utils.dates import days_ago
from airflow.operators.bash import BashOperator
from airflow.operators.python import PythonOperator
from google.cloud import storage
from airflow.providers.google.cloud.operators.bigquery import BigQueryCreateExternalTableOperator
import pyarrow.csv as pv
import pyarrow.parquet as pq
PROJECT_ID = os.environ.get("GCP_PROJECT_ID")
BUCKET = os.environ.get("GCP_GCS_BUCKET")
dataset_file = "yellow_tripdata_2021-01.csv"
dataset_url = f"https://s3.amazonaws.com/nyc-tlc/trip+data/{dataset_file}"
path_to_local_home = os.environ.get("AIRFLOW_HOME", "/opt/airflow/")
parquet_file = dataset_file.replace('.csv', '.parquet')
BIGQUERY_DATASET = os.environ.get("BIGQUERY_DATASET", 'trips_data_all')

def format_to_parquet(src_file):
    if not src_file.endswith('.csv'):
        logging.error("Can only accept source files in CSV format, for the moment")
        return
    table = pv.read_csv(src_file)
    pq.write_table(table, src_file.replace('.csv', '.parquet'))

# NOTE: takes 20 mins, at an upload speed of 800kbps. Faster if your internet has a better upload speed
def upload_to_gcs(bucket, object_name, local_file):
    """
    Ref: https://cloud.google.com/storage/docs/uploading-objects#storage-upload-object-python
    :param bucket: GCS bucket name
    :param object_name: target path & file-name
    :param local_file: source path & file-name
    :return:
    """
    # WORKAROUND to prevent timeout for files > 6 MB on 800 kbps upload speed.
    # (Ref: https://github.com/googleapis/python-storage/issues/74)
    storage.blob._MAX_MULTIPART_SIZE = 5 * 1024 * 1024  # 5 MB
    storage.blob._DEFAULT_CHUNKSIZE = 5 * 1024 * 1024  # 5 MB
    # End of Workaround
    client = storage.Client()
    bucket = client.bucket(bucket)
    blob = bucket.blob(object_name)
    blob.upload_from_filename(local_file)

default_args = {
    "owner": "airflow",
    "start_date": days_ago(1),
    "depends_on_past": False,
    "retries": 1,
}
# NOTE: DAG declaration - using a Context Manager (an implicit way)
with DAG(
    dag_id="data_ingestion_gcs_dag",
    schedule_interval="@daily",
    default_args=default_args,
    catchup=False,
    max_active_runs=1,
    tags=['dtc-de'],
) as dag:
    download_dataset_task = BashOperator(
        task_id="download_dataset_task",
        bash_command=f"curl -sS {dataset_url} > {path_to_local_home}/{dataset_file}"
    )
    format_to_parquet_task = PythonOperator(
        task_id="format_to_parquet_task",
        python_callable=format_to_parquet,
        op_kwargs={
            "src_file": f"{path_to_local_home}/{dataset_file}",
        },
    )
    # TODO: Homework - research and try XCOM to communicate output values between 2 tasks/operators
    local_to_gcs_task = PythonOperator(
        task_id="local_to_gcs_task",
        python_callable=upload_to_gcs,
        op_kwargs={
            "bucket": BUCKET,
            "object_name": f"raw/{parquet_file}",
            "local_file": f"{path_to_local_home}/{parquet_file}",
        },
    )
    bigquery_external_table_task = BigQueryCreateExternalTableOperator(
        task_id="bigquery_external_table_task",
        table_resource={
            "tableReference": {
                "projectId": PROJECT_ID,
                "datasetId": BIGQUERY_DATASET,
                "tableId": "external_table",
            },
            "externalDataConfiguration": {
                "sourceFormat": "PARQUET",
                "sourceUris": [f"gs://{BUCKET}/raw/{parquet_file}"],
            },
        },
    )
    download_dataset_task >> format_to_parquet_task >> local_to_gcs_task >> bigquery_external_table_task
Let’s run it. First, go to localhost:8080 and use airflow and airflow as username and password to log in. Then switch on the data_ingestion_gcs_dag and click on that to open and be able to see the tree. You can also switch to a graph using the toolbar on top of the page.
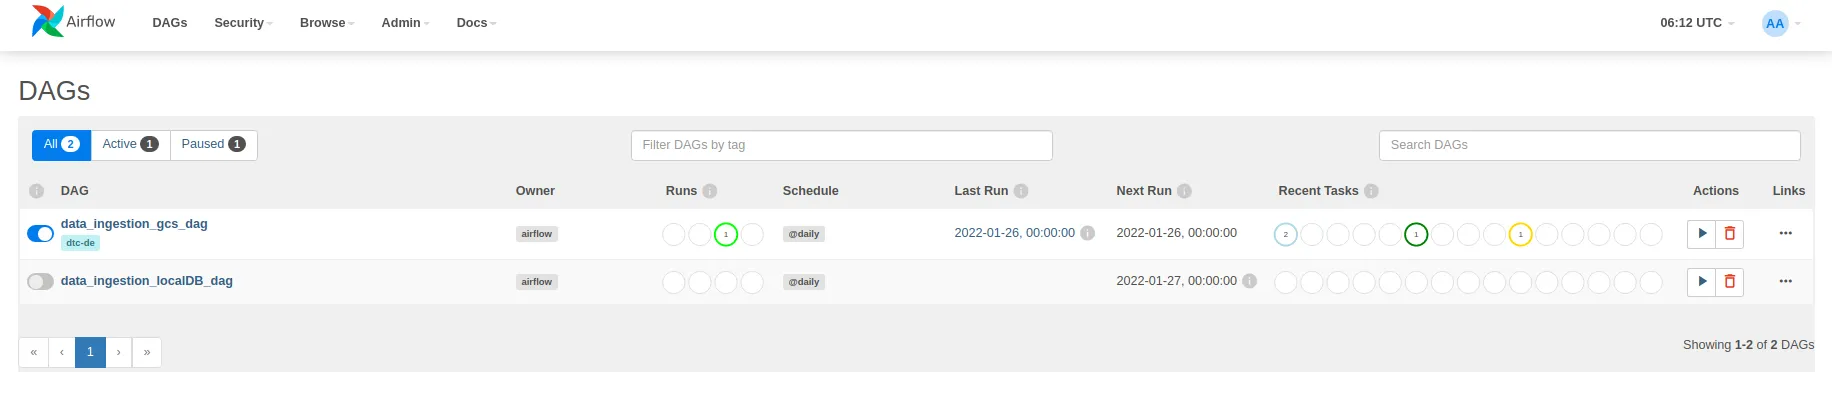
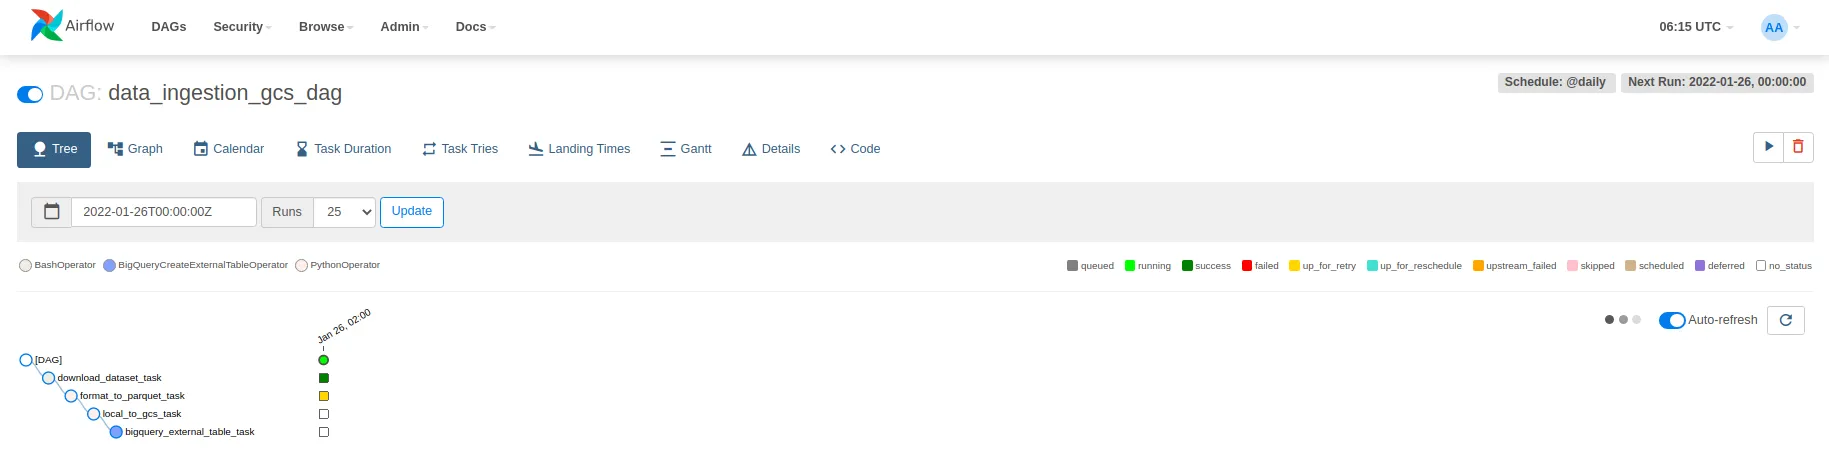
Then click on the play button on top-right part of the page and select Trigger DAG. Note that after running docker-compose ps everything should be in the healthy mode.
If any of the tasks fails, you can examine the logs as follows:
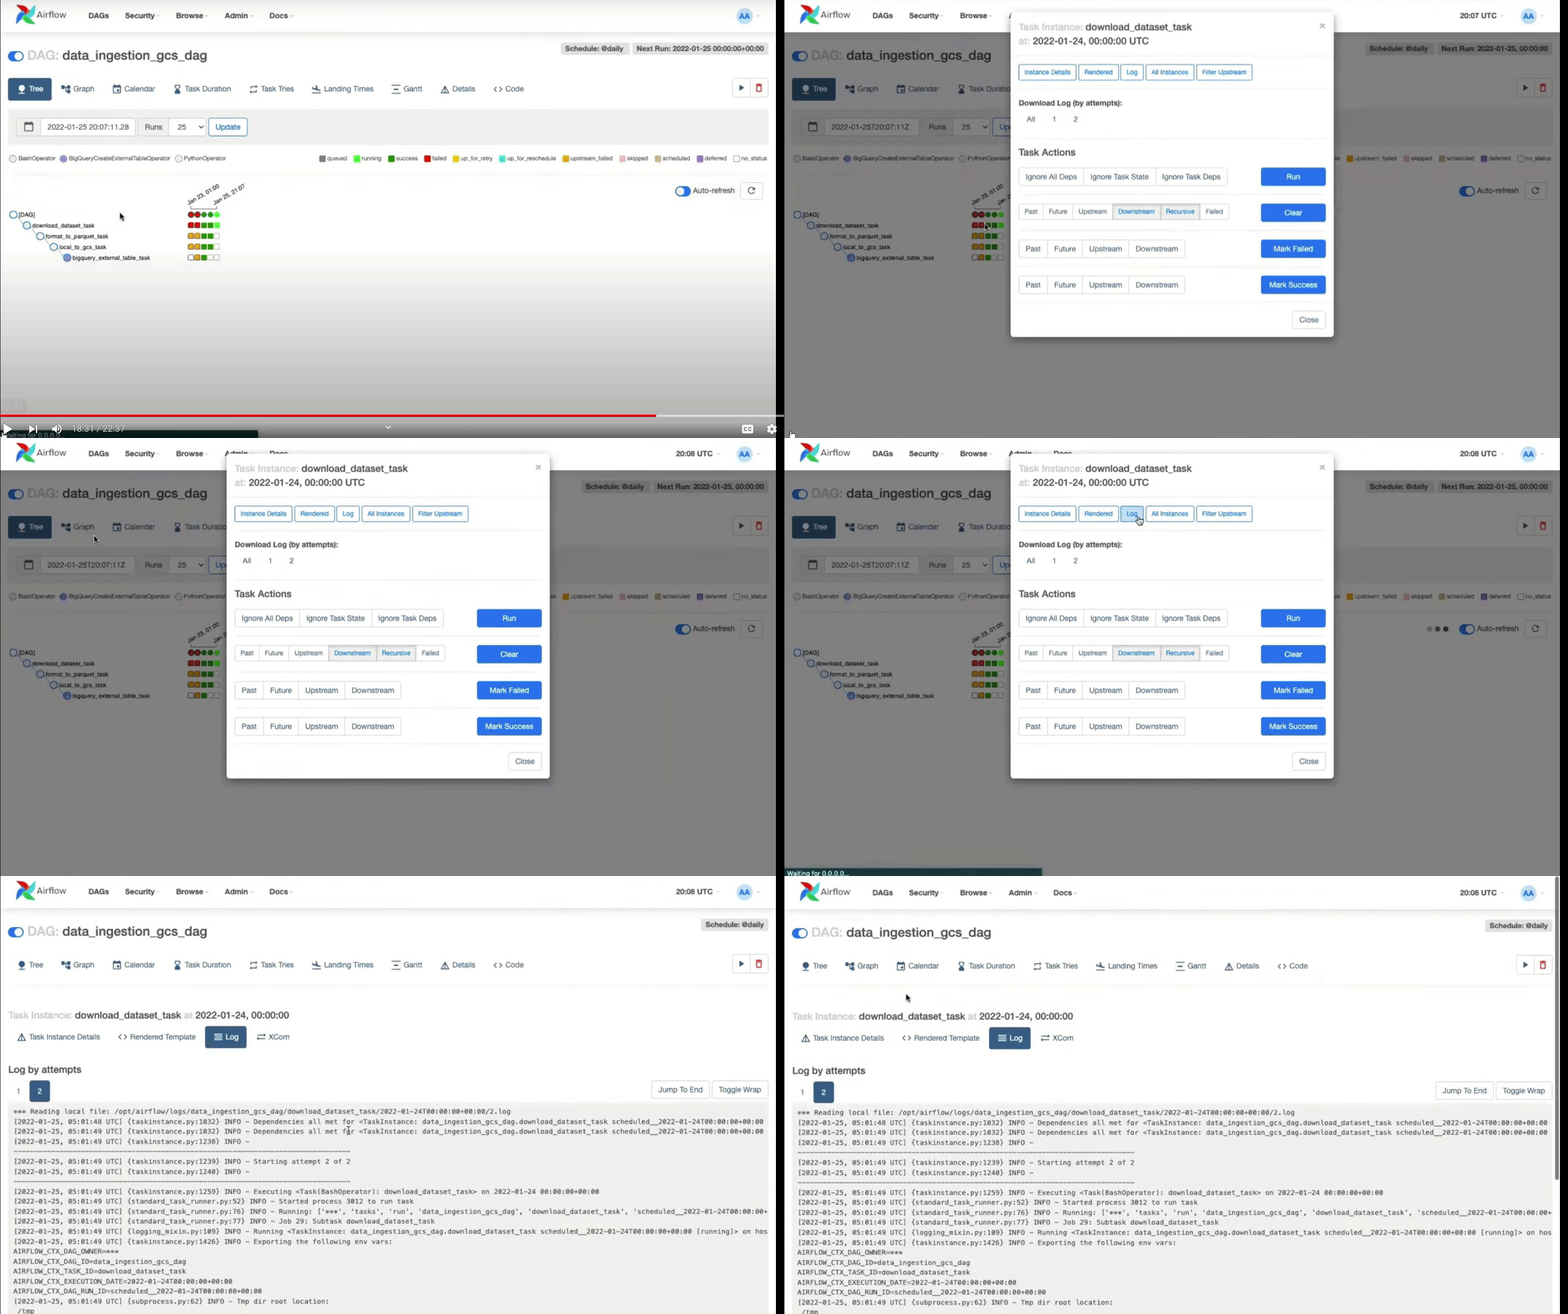
If the tasks are completed successfully, then you will see the uploaded parquet file in the GCS bucket and also the table in BigQuery.
Note: All the PythonOperator codes (functions called by that) are executed in airflow-workers (which is a container) and files (datasets) are saved there and not in your local machine. If you use DockerOperator, you are actually running a docker inside another docker (airflow-worker).
When you finish your run you can shut down the container(s) using:
docker-compose downTo stop and delete containers, delete volumes with database data, and download images, run:
docker-compose down --volumes --rmi all
or
docker-compose down --volumes --remove-orphans
Ingest Data to Postgres using Airflow
In order to see another step-by-step tutorial on ingesting data to local Postgres using airflow, you can check the following video.
Before, we uploaded data to GCS using the upload_to_gcs function. But here, as we want to ingest data into Postgres (which we will run using another docker-compose), we need to use another function. All the steps are the same (check the above video), and we just check the DAG file and ingestion script here, which is a modified version of what we used in week 1.
Let’s see the week_2_data_ingestion/airflow/dags_local/data_ingestion_local.py file first:
import os
from time import time
import pandas as pd
from sqlalchemy import create_engine
def ingest_callable(user, password, host, port, db, table_name, csv_file, execution_date):
    print(table_name, csv_file, execution_date)
    engine = create_engine(f'********************************************/{db}')
    engine.connect()
    print('connection established successfully, instering data...')
    t_start = time()
    df_iter = pd.read_csv(csv_file, iterator=True, chunksize=100000)
    df = next(df_iter)
    df.tpep_pickup_datetime = pd.to_datetime(df.tpep_pickup_datetime)
    df.tpep_dropoff_datetime = pd.to_datetime(df.tpep_dropoff_datetime)
    df.head(n=0).to_sql(name=table_name, con=engine, if_exists='replace')
    df.to_sql(name=table_name, con=engine, if_exists='append')
    t_end = time()
    print('inserted the first chunk, took %.3f second' % (t_end - t_start))
    while True:
        t_start = time()
        try:
            df = next(df_iter)
        except StopIteration:
            print("completed")
            break
        df.tpep_pickup_datetime = pd.to_datetime(df.tpep_pickup_datetime)
        df.tpep_dropoff_datetime = pd.to_datetime(df.tpep_dropoff_datetime)
        df.to_sql(name=table_name, con=engine, if_exists='append')
        t_end = time()
        print('inserted another chunk, took %.3f second' % (t_end - t_start))
Now we have two docker-compose.yaml files: one for this week which runs airflow stuff and one for week 1 for Postgres and pgadmin. Let’s see how we can connect them.
When we run the docker-compose.yaml file for airflow, it creates a network called airflow_default which we will use as an external network to connect the docker-compose for Postgres and pgadmin to [ ref].
# docker-compose.yaml of week 1
services:
    pgdatabase:
        image: postgres:13
        environment:
            - POSTGRES_USER=root
            - POSTGRES_PASSWORD=****
            - POSTGRES_DB=ny_taxi
        volumes:
            - "./ny_taxi_postgres_data:/var/lib/postgresql/data:rw"
        ports:
            - "5432:5432"
        networks:
            - airflow
    pgadmin:
        image: dpage/pgadmin4
        environment:
            - PGADMIN_DEFAULT_EMAIL=admin@admin.com
            - PGADMIN_DEFAULT_PASSWORD=root
        ports:
            - "8080:80"

networks:
  airflow:
    external:
      name: airflow_default
We will have two Postgres databases, one for airflow that stores its own metadata and one for uploading our dataset.
First, run docker-compose up in the week 1 folder, and then test if you can connect using pgcli -h localhost -p 5432 -U root -d ny_taxi command.
Then we can go to the airflow worker container and see if we can connect to the Postgres database that we ran above:
docker exec -it <container id> bash
# then type python to open python
> > from sqlalchemy import create_engine
>> engine = create_engine('**************************************/ny_taxi')>> engine.connect()
# no error here
If you don’t see any error by following the above procedure, it shows that you can connect to Postgres from the Airflow worker container. So calling the ingestion script from the PythonOperator in the DAG file should work. Now you can run both docker-compose files and go to the Airflow web interface to see the DAGs running.
On finishing your run or to shut down the container/s:
docker-compose downTo stop and delete containers, delete volumes with database data, and download images, run:
docker-compose down --volumes --rmi all
or
docker-compose down --volumes --remove-orphans
Transfer Service in GCP
Until now we have used airflow DAGs to download datasets and then push them into GCS. We can also use a service from GCP called transfer service to do this task directly from other cloud providers or local storage. Storage transfer service is a secure, low-cost service for transferring data from the cloud, like AWS or Azure, or on-premises sources. If you search for the transfer service in GCP, there are two separate services, one for the cloud and one for on-premises.
To activate a job, you can use terraform or the UI in GCP. Check the following video to learn how to do it via GCP.
To learn how to do it via terraform, please check the following video:
Conclusion
The reviewed procedure in this post for Airflow is not really suitable for production. Usually a combination of Airflow & Kubernetes & Git can be used. You can check the following resources to learn more.
Deploying Apache Airflow to Google Kubernetes Engine
You can also use the Google Cloud Composer service to have a fully managed Airflow. This would be easier with a bit more cost.
A Cloud Composer environment is a wrapper around Apache Airflow. Cloud Composer creates the following components for each environment: [ gcp docs]
- GKE cluster: The Airflow schedulers, workers, and Redis Queue run as GKE workloads on a single cluster, and are responsible for processing and executing DAGs. The cluster also hosts other Cloud Composer components like Composer Agent and Airflow Monitoring, which help manage the Cloud Composer environment, gather logs to store in Cloud Logging, and gather metrics to upload to Cloud Monitoring.
- Web server: The web server runs the Apache Airflow web interface, and Identity-Aware Proxy protects the interface. For more information, see Airflow Web Interface.
- Database: The database holds the Apache Airflow metadata.
- Cloud Storage bucket: Cloud Composer associates a Cloud Storage bucket with the environment. The associated bucket stores the DAGs, logs, custom plugins, and data for the environment. For more information about the storage bucket for Cloud Composer, see Data Stored in Cloud Storage.
To access and manage your Airflow environments, you can use the following Airflow-native tools:
- Web interface: You can access the Airflow web interface from the Google Cloud Console or by direct URL with the appropriate permissions. For information, see Airflow Web Interface.
- Command line tools: After you install the Google Cloud CLI, you can run gcloud composer environments commands to issue Airflow command-line commands to Cloud Composer environments. For information, see [Airflow Command-line Interface][cc-access-airflow-cli].
In addition to native tools, the Cloud Composer REST and RPC APIs provide programmatic access to your Airflow environments.
Thank you for taking the time to read my post. If you found it helpful or enjoyable, please consider giving it a like and sharing it with your friends. Your support means the world to me and helps me to continue creating valuable content for you.
Work with Nazmi
Have a problem like this to ship?
The two-week AI Opportunity Audit turns it into a prioritized map, a 90-day roadmap, and one build-ready spec — a fixed-fee first step.
See the AI Opportunity Audit or book a 20-minute call →