
Data Engineering — Week 2a: Data Ingestion
Week 2 — Data Engineering Zoomcamp course: Data ingestion
Note: The content of this post is from the course videos, my understanding and searches, and reference documentation.
I split this week’s content into two blog posts. Let’s start with the first one.
Data Lake
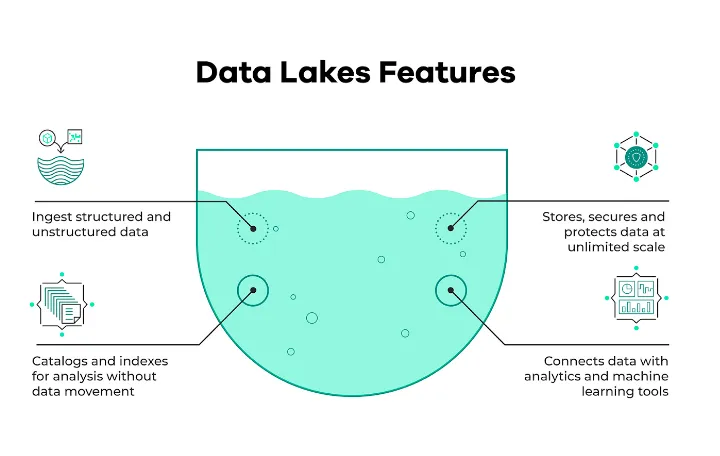
A data lake is a collection of technologies that enables the querying of data contained in files or blob objects. When used effectively, they enable massive scale and cost-effective analysis of structured and unstructured data assets source.
Data lakes are comprised of four primary components: storage, format, compute, and metadata layers source.
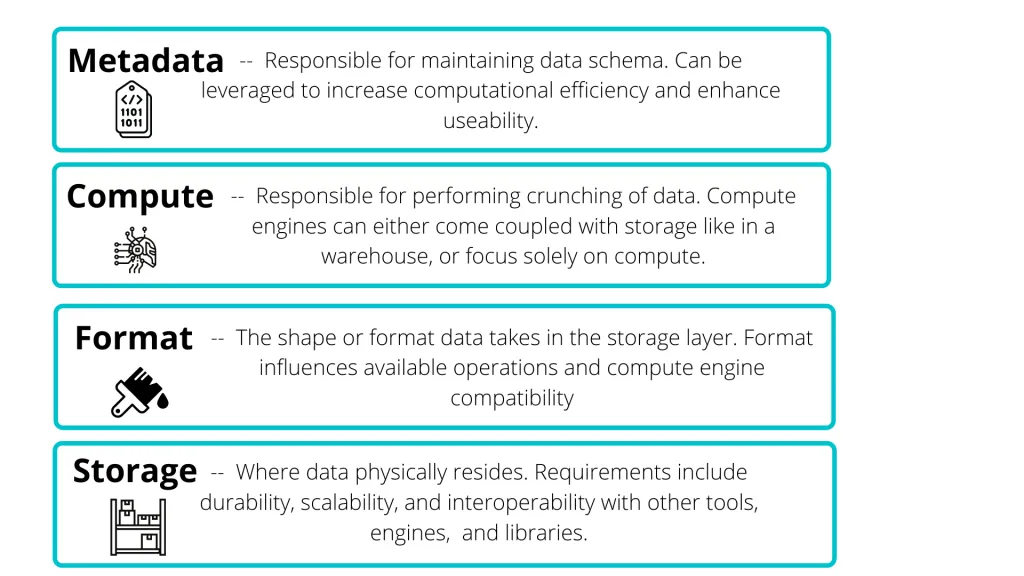
A “data lake” is a centralized repository for large amounts of data from a variety of sources. Data can be structured, semi-structured, or unstructured in general. The goal is to quickly take in data and make it available to data scientists, analysts, and engineers, among other team members. The data lake is widely used for machine learning and analytical solutions. Most of the time, when you store data in a data lake, you give it some kind of metadata to make it easier to find. Generally, a data lake solution must be secure and scalable. Additionally, the hardware should be affordable. The reason for this is that you want to store as much data as possible.
Data Lake vs Data Warehouse
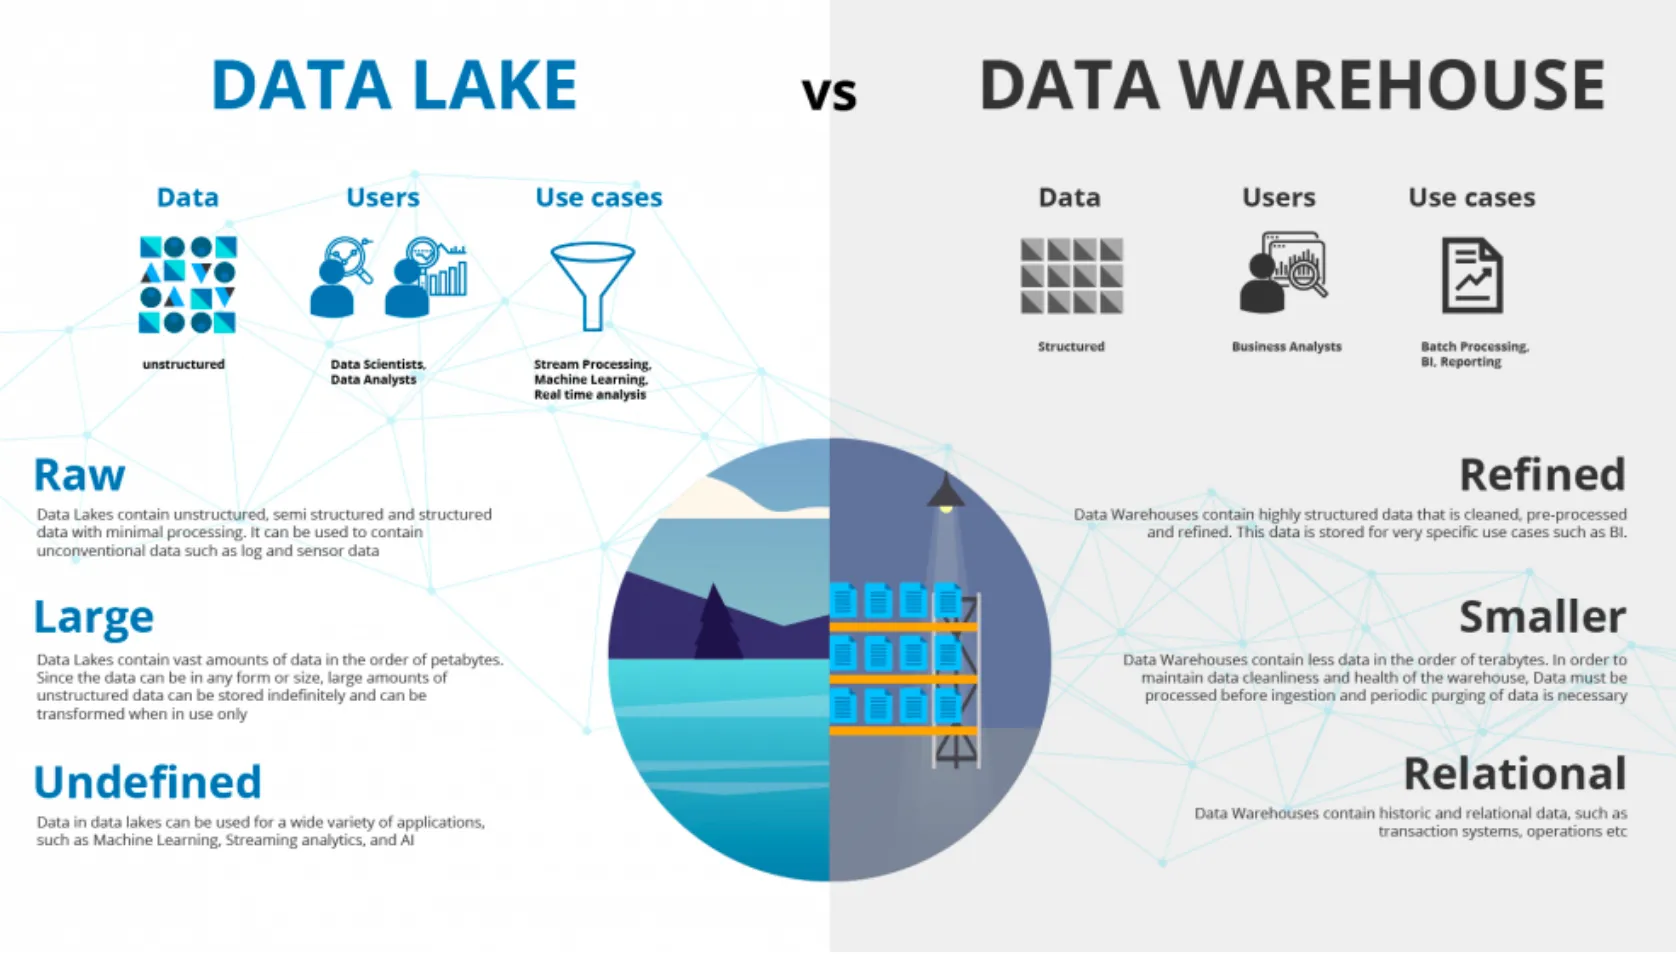
Generally, a data lake is unstructured data, and the target users are data scientists or data analysts. It stores huge amounts of data, sometimes in the size of petabytes and terabytes. The use cases that are covered by the data lake are basically stream processing, machine learning, and real-time analytics. On the data warehouse side, the data is generally structured. The people who use it are business analysts, the size of the data is usually small, and the use case is batch processing or BI reporting.
To read more, please check here and here.
ETL vs ELT
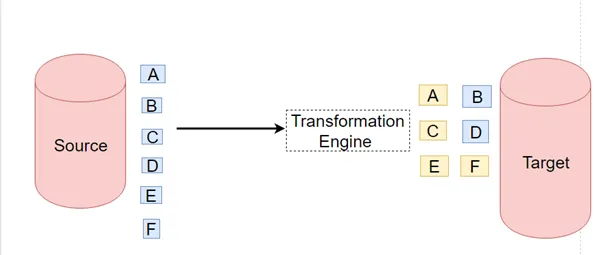
- Extract Transform and Load vs Extract Load and Transform
- ETL is mainly used for a small amount of data whereas ELT is used for large amounts of data
- ELT provides data lake support (Schema on reading)
- ETL provides data warehouse solutions
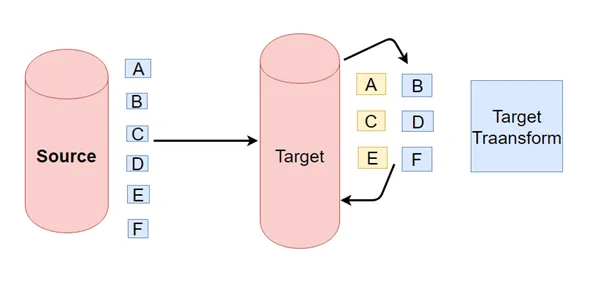
Data lake solutions provided by the main cloud providers are as follows:
- GCP — cloud storage
- AWS — S3
- AZURE — AZURE BLOB
Workflow Orchestration
We saw a simple data pipeline in Week 1. One of the problems in that data pipeline was that we did several important jobs in the same place: downloading data, doing some small processing, and putting it into Postgres. What if, after downloading data, some error happens in the code or with the internet? We will lose the downloaded data and should do everything from scratch. That’s why we need to do those steps separately.
A data pipeline is a series of steps for data processing. If the data has not yet been loaded into the data platform, it is ingested at the pipeline’s start. Then there is a series of steps. Each step produces an output that becomes the input for the next step. This procedure is repeated until the pipeline is completed. In some instances, independent steps may be performed concurrently. source.
A data pipeline has three important parts: a source, a processing step or set of processing steps, and an endpoint. The destination may be referred to as a sink in some data pipelines. Data pipelines, for example, make it possible for data to move from an application to a data warehouse, from a data lake to an analytics database, or to a payment processing system. Data pipelines can also use the same source and sink, which lets the pipeline focus only on changing the data. When data is processed between points A and B (or B, C, and D), there is a data pipeline between those points source.

In our example, the data pipeline we had in the previous week can be as follows:
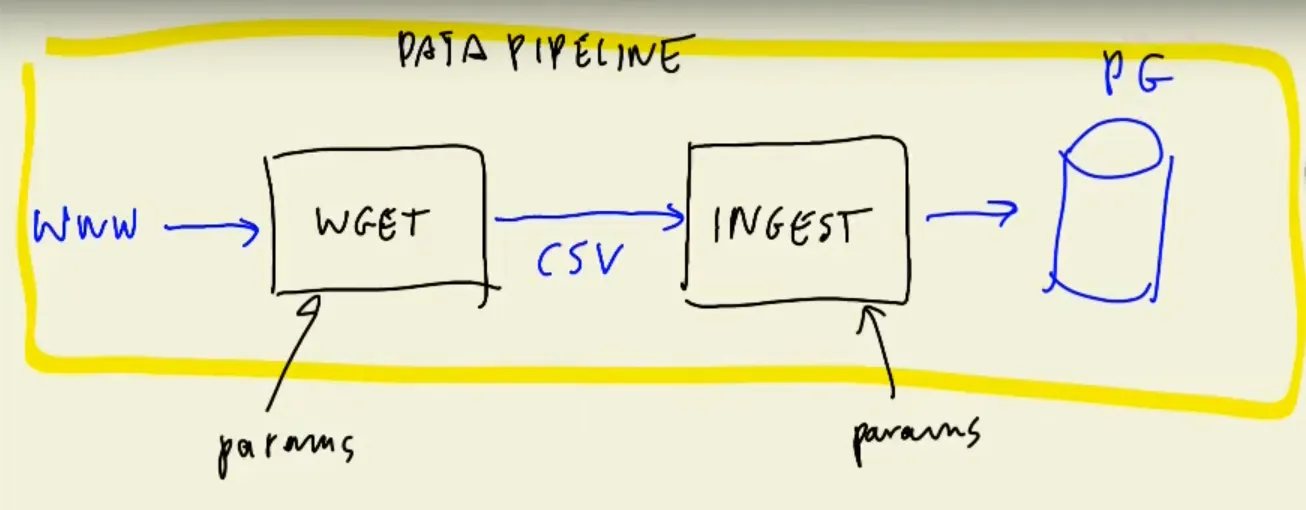
We separated downloading dataset using wget and then ingesting it into Postgres. I think we can have even another step for processing (changing the string to DateTime in the downloaded dataset).
But this week, we will do something more complex. Let’s have a look at the data workflow.
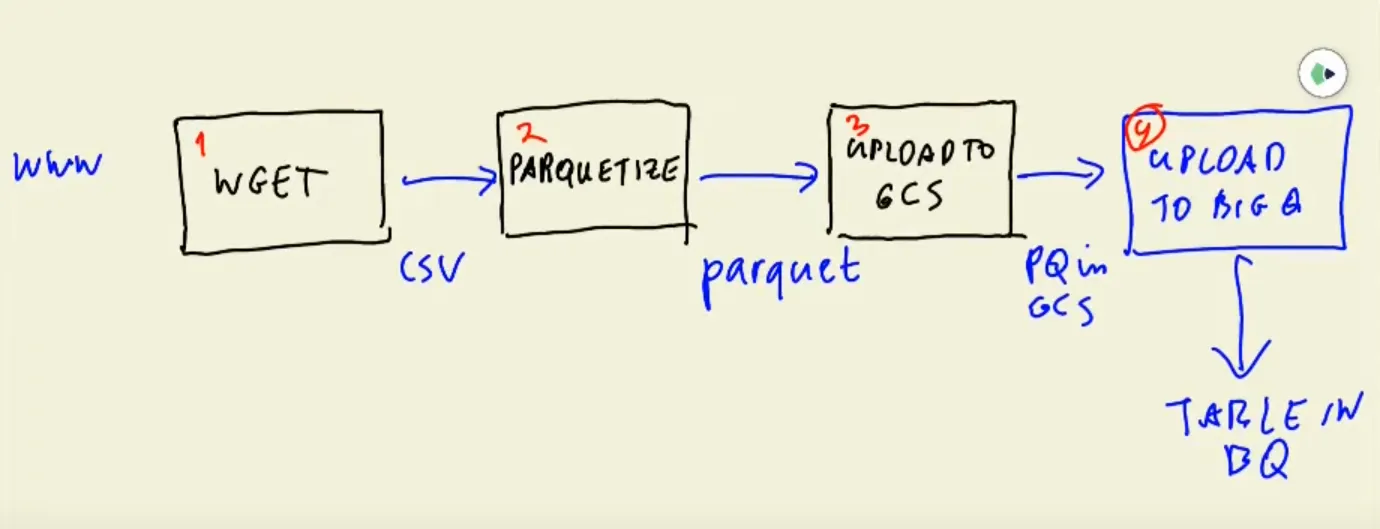
The above figure is called a DAG (Directed Acyclic Graph). We need to be sure that all steps are done sequentially, and we can retry some of the steps if something happens and then go to the next step. There are some tools called workflow engines that allow us to define these DAGs and do the data workflow orchestration:
- LUIGI
- Prefect
- Apache Airflow (we will go for this)
- Google Cloud Dataflow
Let’s get more familiar with some of them:
Airflow

Airflow is a platform to programmatically author, schedule, and monitor workflows. Use Airflow to author workflows as Directed Acyclic Graphs (DAGs) of tasks. The Airflow scheduler executes your tasks on an array of workers while following the specified dependencies. Rich command line utilities make performing complex surgeries on DAGs a snap. The rich user interface makes it easy to visualize pipelines running in production, monitor progress, and troubleshoot issues when needed. When workflows are defined as code, they become more maintainable, versionable, testable, and collaborative Airflow docs.
Google Cloud Dataflow
Real-time data is generated by websites, mobile applications, IoT devices, and other workloads. All businesses make data collection, processing, and analysis a priority. However, data from these systems is frequently not in a format suitable for analysis or effective use by downstream systems. That is where Dataflow enters the picture! Dataflow is used to process and enrich batch or stream data for analysis, machine learning, and data warehouse applications.
Dataflow is a serverless, high-performance, and cost-effective service for stream and batch processing. It enables portability for processing jobs written in the open-source Apache Beam libraries and alleviates the operational burden on your data engineering teams by automating infrastructure provisioning and cluster management Google cloud docs.
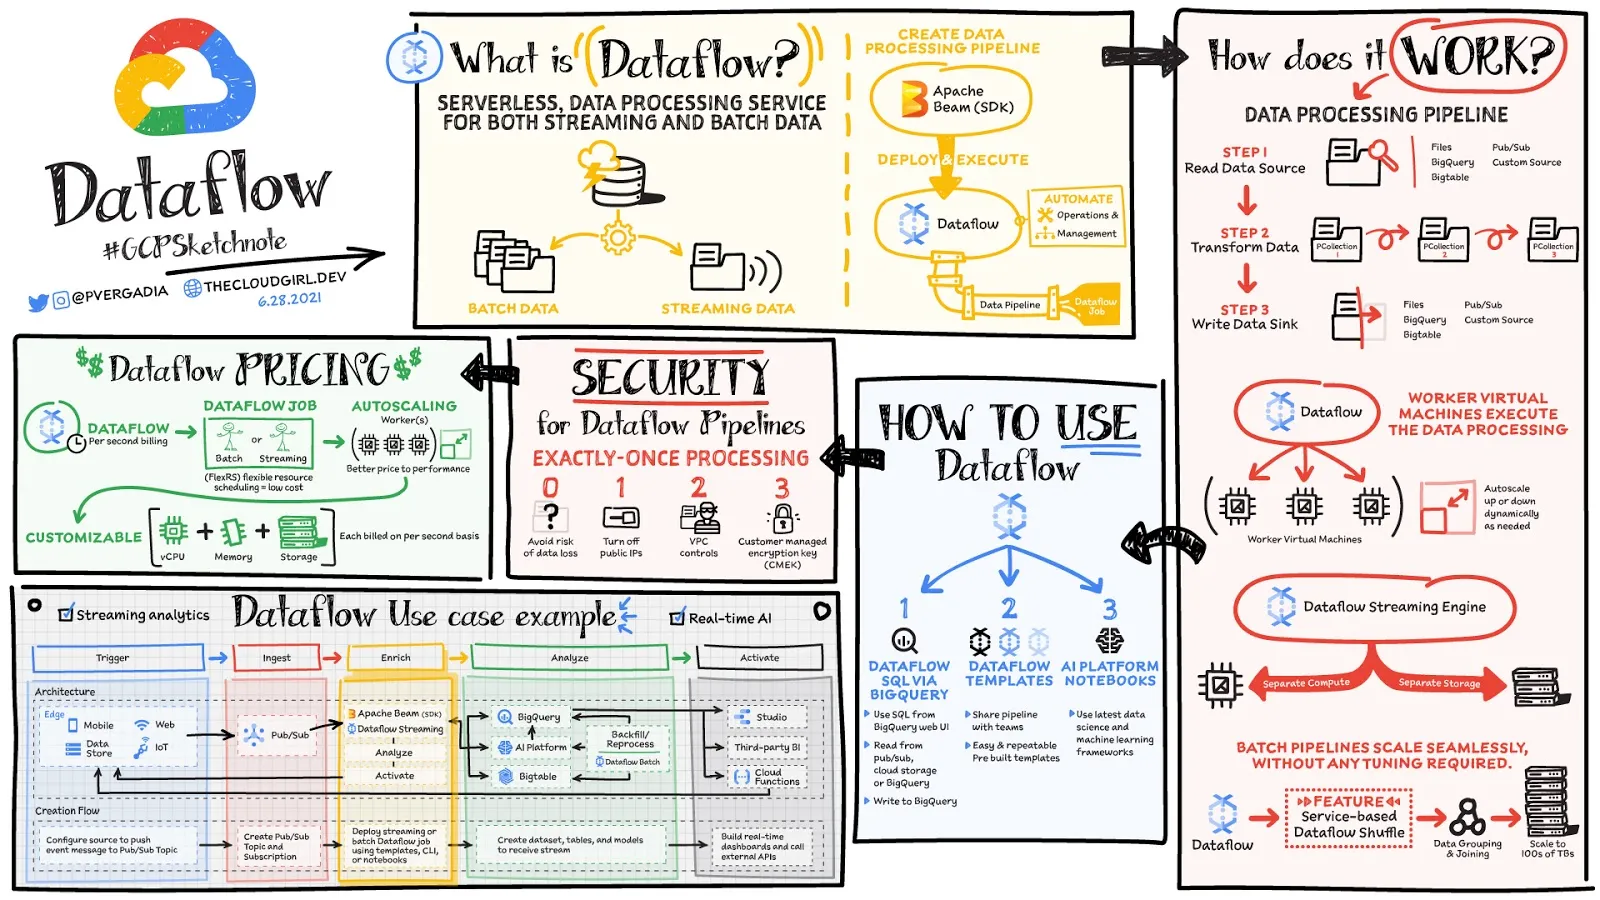
Here is a comparison between Airflow and Google Cloud Dataflow.
Google Cloud Composer
Google also provides a fully managed service for workflow orchestration built on Apache Airflow called Google Cloud Composer.
Cloud Composer is a fully managed workflow orchestration service that lets you create, schedule, monitor, and manage workflows that run in both the cloud and on-premises data centers. Cloud Composer is based on the popular open-source project Apache Airflow and works with the programming language Python. If you use Cloud Composer instead of a local instance of Apache Airflow, you can get the best parts of Airflow without having to install or manage it. Cloud Composer helps you create Airflow environments quickly and use Airflow-native tools, such as the powerful Airflow web interface and command-line tools, so you can focus on your workflows and not your infrastructure gcp docs.
Here is a good comparison between Google Cloud Composer and Airflow on Docker and on-premises:
Cloud Composer is a GCP managed service for Airflow. Composer runs in something known as a Composer environment, which runs on Google Kubernetes Engine cluster. It also makes use of various other GCP services such as:
— Cloud SQL — stores the metadata associated with Airflow,
— App Engine Flex — Airflow web server runs as an App Engine Flex application, which is protected using an Identity-Aware Proxy,
— GCS bucket — in order to submit a pipeline to be scheduled and run on Composer, all that we need to do is to copy out Python code into a GCS bucket. Within that, it’ll have a folder called DAGs. Any Python code uploaded into that folder is automatically going to be picked up and processed by Composer.
How Cloud Composer benefits?
— Focus on your workflows, and let Composer manage the infrastructure (creating the workers, setting up the web server, the message brokers),
— One-click to create a new Airflow environment,
— Easy and controlled access to the Airflow Web UI,
— Provide logging and monitoring metrics, and alert when your workflow is not running,
— Integrate with all of Google Cloud services: Big Data, Machine Learning and so on. Run jobs elsewhere, i.e. other cloud provider (Amazon).
Of course you have to pay for the hosting service, but the cost is low compare to if you have to host a production airflow server on your own.
Airflow on-premise
— DevOps work that need to be done: create a new server, manage Airflow installation, takes care of dependency and package management, check server health, scaling and security.
— pull an Airflow image from a registry and creating the container
— creating a volume that maps the directory on local machine where DAGs are held, and the locations where Airflow reads them on the container,
— whenever you want to submit a DAG that needs to access GCP service, you need to take care of setting up credentials. Application’s service account should be created and downloaded as a JSON file that contains the credentials. This JSON file must be linked into your docker container and the GOOGLE_APPLICATION_CREDENTIALS environment variable must contain the path to the JSON file inside the container.
To sum up, if you don’t want to deal with all of those DevOps problem, and instead just want to focus on your workflow, then Google Cloud composer is a great solution for you.
To compare Google Dataflow and Google Cloud Composer, I found this StackOverflow answer very interesting:
For the basics of your described task, Cloud Dataflow is a good choice. Big data that can be processed in parallel is a good choice for Cloud Dataflow.
The real world of processing big data is usually messy. Data is usually somewhat to very dirty, arrives constantly or in big batches and needs to be processed in time sensitive ways. Usually it takes the coordination of more than one task / system to extract desired data. Think of load, transform, merge, extract and store types of tasks. Big data processing is often glued together using using shell scripts and / or Python programs. This makes automation, management, scheduling and control processes difficult.
Google Cloud Composer is a big step up from Cloud Dataflow. Cloud Composer is a cross platform orchestration tool that supports AWS, Azure and GCP (and more) with management, scheduling and processing abilities.
Cloud Dataflow handles tasks. Cloud Composer manages entire processes coordinating tasks that may involve BigQuery, Dataflow, Dataproc, Storage, on-premises, etc.
If you need / require more management, control, scheduling, etc. of your big data tasks, then Cloud Composer adds significant value. If you are just running a simple Cloud Dataflow task on demand once in a while, Cloud Composer might be overkill.
In this post, we just review Airflow and how to use it on Docker. Let’s get started.
Airflow
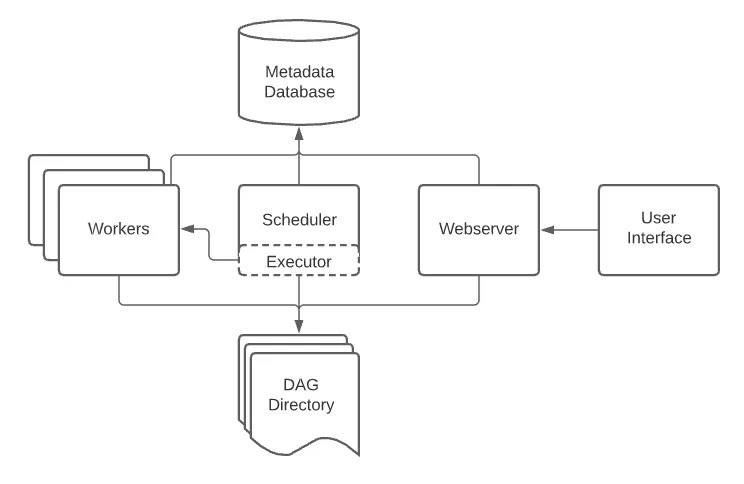
Let’s review the Airflow architecture. An Airflow installation generally consists of the following components:
- Web server: GUI to inspect, trigger and debug the behavior of DAGs and tasks. Available at http://localhost:8080.
- Scheduler: Responsible for scheduling jobs. Handles both triggering & scheduled workflows, submits Tasks to the executor to run, monitors all tasks and DAGs, and then triggers the task instances once their dependencies are complete.
- Worker: This component executes the tasks given by the scheduler.
- Metadata database (Postgres): Backend to the Airflow environment. Used by the scheduler, executor, and webserver to store state.
Other components (seen in docker-compose services):
- redis: Message broker that forwards messages from scheduler to worker.
- flower: The flower app for monitoring the environment. It is available at http://localhost:5555.
- airflow-init: initialization service (customized as per this design)
Please read more about Airflow architecture here before continuing the blog post.
Now let’s install Airflow environment using docker.
You may need Python version 3.7+.
You may also need to upgrade your docker-compose version to v2.x+ (as suggested in the course — however airflow documentation suggests v1.29.1 or newer).
The default amount of memory available for Docker on macOS is often not enough to get Airflow up and running. If enough memory is not allocated, it might lead to the Airflow webserver continuously restarting. You should at least allocate 4GB memory for the Docker Engine (ideally 8GB). You can check and change the amount of memory in Resources
You can also check if you have enough memory by running this command: Airflow docs
docker run --rm "debian:buster-slim" bash -c 'numfmt --to iec $(echo $(($(getconf _PHYS_PAGES) * $(getconf PAGE_SIZE))))'For me, this is 16 GB:
Unable to find image 'debian:buster-slim' locally
buster-slim: Pulling from library/debian
6552179c3509: Pull complete
Digest: sha256:f6e5cbc7eaaa232ae1db675d83eabfffdabeb9054515c15c2fb510da6bc618a7
Status: Downloaded newer image for debian:buster-slim
16G
If not enough memory is set aside, the Airflow webserver might have to keep restarting. I used this answer to update mine. For limiting memory, it is easy to do it in mac and windows like here and for Linux you can check here.
To deploy Airflow on Docker Compose, you should fetch docker-compose.yaml.
curl -LfO 'https://airflow.apache.org/docs/apache-airflow/2.2.3/docker-compose.yaml'This file contains several service definitions:
- airflow-scheduler — The scheduler monitors all tasks and DAGs, then triggers the task instances once their dependencies are complete. Behind the scenes, the scheduler spins up a subprocess, which monitors and stays in sync with all DAGs in the specified DAG directory. Once per minute, by default, the scheduler collects DAG parsing results and checks whether any active tasks can be triggered ref.
- airflow-webserver — The webserver is available at http://localhost:8080.
- airflow-worker — The worker that executes the tasks given by the scheduler.
- airflow-init — The initialization service.
- flower — The flower app is a web-based tool for monitoring the environment. It is available at http://localhost:5555.
- Postgres — The database.
- Redis — The Redis — broker that forwards messages from the scheduler to the worker.
All these services allow you to run Airflow with CeleryExecutor. For more information, see Architecture Overview.
Some directories in the container are mounted, which means that their contents are synchronized between your computer and the container.
- ./dags — you can put your DAG files here.
- ./logs — contains logs from task execution and scheduler.
- ./plugins — you can put your custom plugins here. Airflow has a simple plugin manager built-in that can integrate external features to its core by simply dropping files in your $AIRFLOW_HOME/plugins folder.
Here is the architecture of docker-compose.yaml file:
version: '3'
x-airflow-common:
  &airflow-common
  # In order to add custom dependencies or upgrade provider packages you can use your extended image.
  # Comment the image line, place your Dockerfile in the directory where you placed the docker-compose.yaml
  # and uncomment the "build" line below, Then run `docker-compose build` to build the images.
  image: ${AIRFLOW_IMAGE_NAME:-apache/airflow:2.2.3}
  # build: .
  environment:
    &airflow-common-env
    AIRFLOW__CORE__EXECUTOR: CeleryExecutor
    AIRFLOW__CORE__SQL_ALCHEMY_CONN: postgresql+psycopg2://airflow:airflow@postgres/airflow
    AIRFLOW__CELERY__RESULT_BACKEND: db+postgresql://airflow:airflow@postgres/airflow
    AIRFLOW__CELERY__BROKER_URL: redis://:@redis:6379/0
    AIRFLOW__CORE__FERNET_KEY: ''
    AIRFLOW__CORE__DAGS_ARE_PAUSED_AT_CREATION: 'true'
    AIRFLOW__CORE__LOAD_EXAMPLES: 'true'
    AIRFLOW__API__AUTH_BACKEND: 'airflow.api.auth.backend.basic_auth'
    _PIP_ADDITIONAL_REQUIREMENTS: ${_PIP_ADDITIONAL_REQUIREMENTS:-}
  volumes:
    - ./dags:/opt/airflow/dags
    - ./logs:/opt/airflow/logs
    - ./plugins:/opt/airflow/plugins
  user: "${AIRFLOW_UID:-50000}:0"
  depends_on:
    &airflow-common-depends-on
    redis:
      condition: service_healthy
    postgres:
      condition: service_healthy

services:
  postgres:
    ...

  redis:
    ...

  airflow-webserver:
    ...

  airflow-scheduler:
    ...

  airflow-worker:
    ...

  airflow-triggerer:
    ...

  airflow-init:
    ...

  airflow-cli:
    ...

  flower:
    ...

volumes:
  postgres-db-volume:
The above file uses the latest Airflow image (apache/airflow). If you need to install a new Python library or system library, you can build your image.
When running Airflow locally, you may wish to use an extended image that includes some additional dependencies — for example, you may wish to add new Python packages or upgrade the Airflow providers to a newer version. This is accomplished by including a custom Dockerfile alongside your docker-compose.yaml file. Then, using the docker-compose build command, you can create your image (you need to do it only once). Additionally, you can add the --build flag to your docker-compose commands to automatically rebuild the images when other docker-compose commands are run. To learn more and see additional examples, visit here Airflow docs.
That’s enough for the next part. We’ll continue in another post.
Thank you for taking the time to read my post. If you found it helpful or enjoyable, please consider giving it a like and sharing it with your friends. Your support means the world to me and helps me to continue creating valuable content for you.
Work with Nazmi
Have a problem like this to ship?
The two-week AI Opportunity Audit turns it into a prioritized map, a 90-day roadmap, and one build-ready spec — a fixed-fee first step.
See the AI Opportunity Audit or book a 20-minute call →